How To Make Homemade Yogurt
By Leite's Culinaria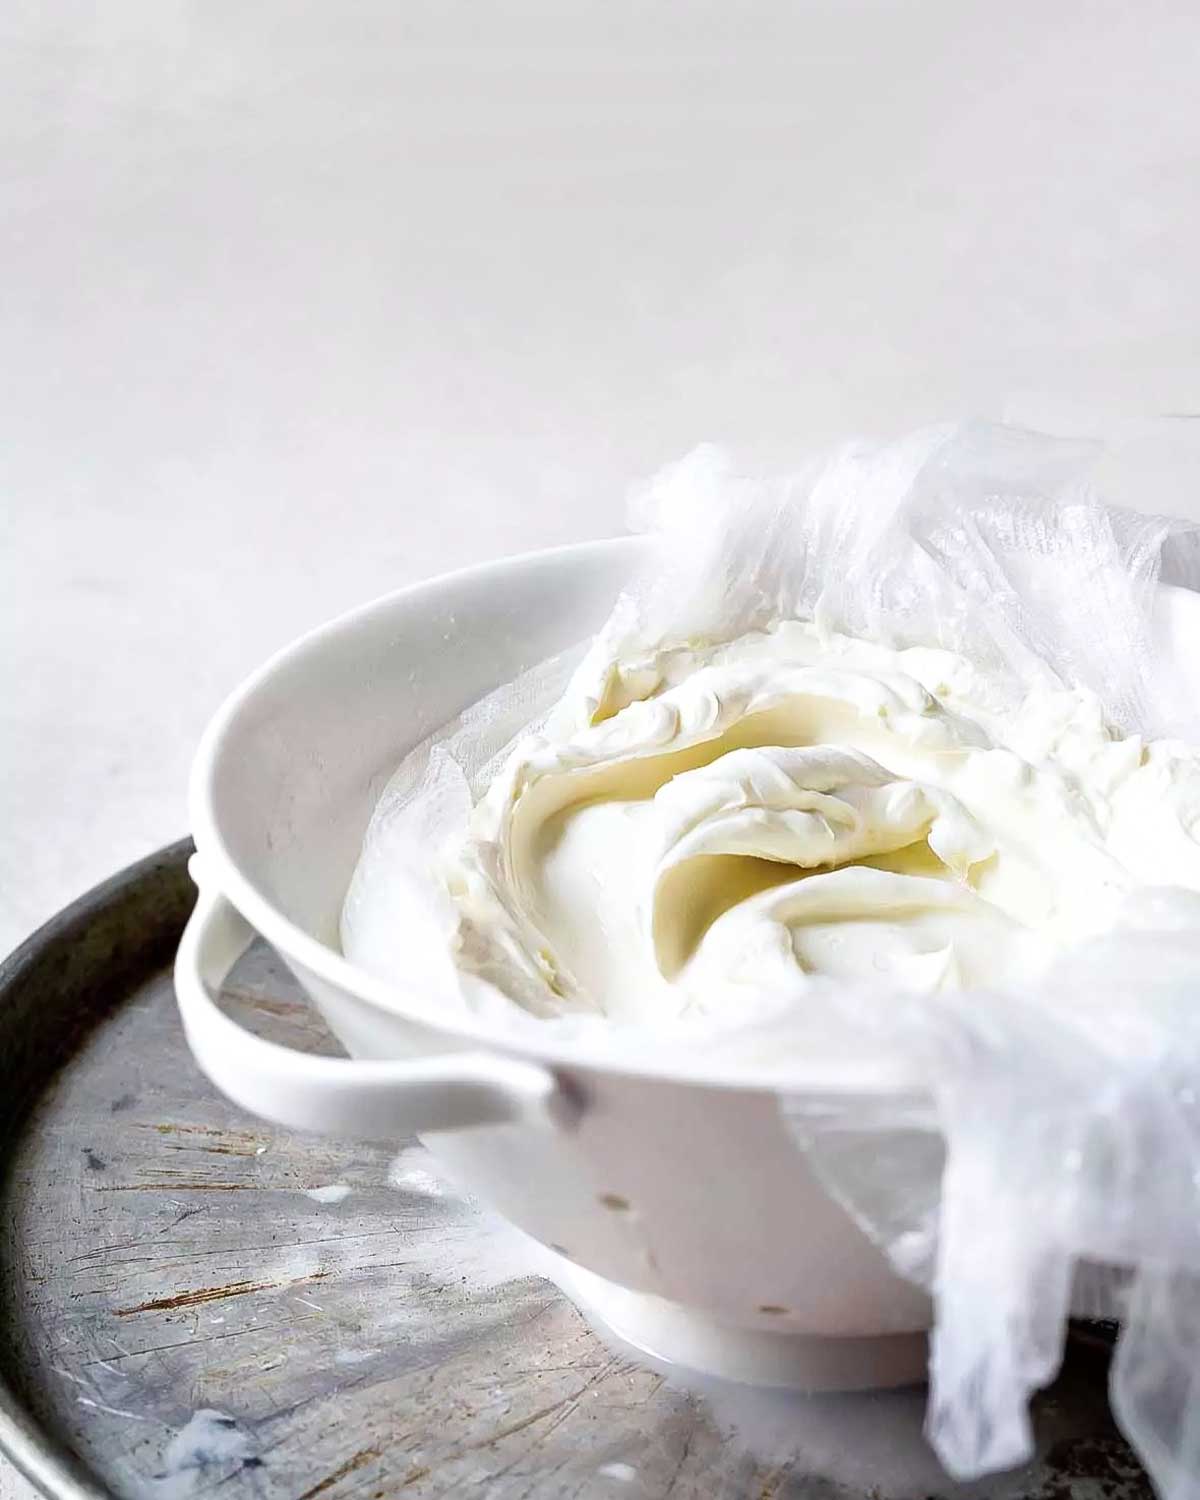
Ingredients
1 quart milk of any type
2 tablespoons instant non-fat dry milk (optional but recommended if you're using low-fat or non-fat milk)
2 tablespoons plain yogurt with live active cultures, at room temperature
- Prep Time30mins
- Cook Time390mins
- Servings4
Instructions
Assemble all the necessary equipment (see below How To Choose An Incubation Method For Your Homemade Yogurt). You don't want to be rummaging around for jar lids when your milk is ready to culture. Make sure that all equipment is scrupulously clean with no soap residue that could damage the culture.
In a 2- to 3-quart (1.8- to 2.8-liter) stainless steel saucepan add in milk and whisk in the instant nonfat dry milk, if using. Set the pan over medium-low heat. For thicker yogurt, heat until the milk registers 195°F (91°C) on an instant-read thermometer, whisking often to prevent the milk from scorching, about 10 minutes. Adjust the heat as needed to keep the milk at or near 195°F (91°C) and cook, whisking often, for 10 minutes. Remove from the heat. (For thinner yogurt, heat until the milk registers 180°F (82°C) or 185°F (85°C) on an instant-read thermometer, whisking often to prevent the milk from scorching, about 10 minutes.) Adjust the heat as needed to keep the milk at or near 195°F (91°C) and cook, whisking often, for 10 minutes. Remove from the heat.
Cover the saucepan and let the milk cool to between 110°F (43°C) and 115°F (46°C), about 1 1 4 hours. You can dramatically accelerate the cooling by placing the saucepan in a large bowl or sink full of ice water and stirring constantly. The milk temperature will plummet to the culturing range in less than 5 minutes, so monitor the temperature often. If it drops too low (below 110°F 43°C), return the saucepan to the stove and gently rewarm the milk over low heat just until it reaches 110°F (43°C) to 115°F (46°C).
While the milk cools to the proper culturing temperature, prepare the jars. Choose a 1-quart (946 ml) jar or several smaller jars with a total capacity of 1 quart (946 ml) or use the jars that come with your yogurt maker. Wash well and then fill the jars with hot water and let stand until you need them. Replace the hot water if it cools so the jars will be warm when you fill them and drain just before filling. Alternatively, heat the jars with hot water, and then drain and place in a preheated electric yogurt maker to keep warm until you are ready to fill them. Note that you don't have to use jars. You can incubate yogurt in a glass or earthenware bowl, or in any nonreactive (nonaluminum) container. You can even incubate it in the saucepan you heated the milk in. However, once the yogurt has set, you need to chill it to stop the fermentation and firm the curd, so make sure your incubation container will fit in the fridge. You don't want to move just-set yogurt to other containers or you will damage the fragile curd.
Put the yogurt in a small, clean bowl and whisk in about 1 cup of the cooled milk. Pour this mixture back into the saucepan, straining it if desired, and whisk gently but thoroughly. You want to incorporate the culture without creating a lot of foam. Immediately move the milk into the prepared jar or jars and cover.
Incubate the yogurt according to your chosen methodsee How To Choose An Incubation Method For Your Homemade Yogurt belowuntil the yogurt thickens and firms. Avoid moving or otherwise agitating the yogurt while it ferments. Check for set after 4 hours and at least once per hour after that. Yogurt can take anywhere from 4 to 12 hours, or even longer, depending on the incubation temperature and the strength of the culture. The longer it takes, the more tart your yogurt will be, as the culture continues to produce lactic acid. If you prefer mellow yogurt, try to stop the incubation as soon as the yogurt has firmed.
To check your homemade yogurt for set, tilt the jar slightly. If the yogurt looks like baked custard and doesn't flow, it has set sufficiently. If it is jiggly and you want it firmer, let it incubate longer. Incubating longer should make it a little more tart and firm, but you can over-incubate it. If whey has collected on the surface, the yogurt probably fermented a little too long or too fast and is starting to separate. Either pour off the surface whey or, after chilling the yogurt, stir it back in. Don't try to stir the whey in before chilling the yogurt, as the curd will be too fragile. Cover the yogurt and place it in the refrigerator until chilled through, at least several hours.
After the yogurt has been in the fridge for several hours, take a taste. If a thicker yogurt is desired, drain it. Draining yogurt dramatically improves its texture, making it thicker, creamier, and more mellow by removing the whey. Draining yogurt also extends its life. And if you are lactose-sensitive, you should find drained yogurt more digestible.To drain your yogurt, gently pour the chilled yogurt into a colander or strainer lined with three layers of dampened cheesecloth. Cover with a plate or clothyou're protecting the yogurt, not pressing itand place it in the fridge. Drain the yogurt until it has the consistency you like. After an hour, the yogurt will be noticeably thicker. If you drain the yogurt more than you'd intended, no problem, simply whisk some of the whey back into the yogurt, adding as much as it takes to attain the texture you desire. Scrape the drained yogurt into a container, cover, and refrigerate.To make Greek yogurt, which is essentially drained yogurt, instead of stopping after an hour of draining, keep going. Depending on the yogurt you started with, it may take 3 to 4 hours to achieve the thick, palate-coating consistency of Greek yogurt.Don't be concerned if each batch of yogurt you make is a little different. Unlike commercial producers with their controlled processes, your home yogurt "factory" is subject to variability: in the milk and culture used, the way you heated and cooled the milk, the length of the fermentation, and the fermentation temperature. Experiment, make notes, and over time you will find the combination of culture, time, and temperature that produces yogurt with the texture and flavor you like.
BreakfastOther popular recipes


Popular categories
- Burgers & Wraps
- Dips & Toppings
- Stews & Chilis
- 4th Of July/Memorial Day
- Accompaniment
- Adult Beverages
- Air Fryer
- Appetizer
- Appetizers
- Appetizers & Snacks
- Appetizers/Snacks
- BBQ
- Beef
- Beverage
- Beverages
- Biscuit
- Bread
- Breads & Muffins
- Breakfast
- Breakfast & Brunch
- Breakfast And Brunch
- Brunch
- Cake
- Cakes
- Cakes & Cupcakes
- Candy
- Casserole
- Casseroles
- Chicken
- Chicken / Poultry
- Chicken Recipe
- Chocolates
- Cobbler
- Cocktail
- Cocktails
- Condiment
- Condiments
- Cookies
- Cookies & Bars
- Cooking Basics
- Dessert
- Desserts
- Desserts & Sweet Treats
- Dinner
- Dip
- Dips
- Dips & Spreads
- Dressing
- Dressings
- Drink
- Drinks
- Drinks & Adult Beverages
- Easy
- Entree
- Fish
- Fish Recipe
- Fried Chicken
- Frostings & Sweet Sauces
- Garnish
- Grains & Pastas
- Gravy
- Grilling
- Ham
- Holiday
- Homemade Ingredients & Condiments
- Hors D'Oeuvres
- Ingredient
- Kitchen Basics
- Lunch
- Main
- Main Course
- Main Dish
- Mains
- Mains & Entrees
- Marinade
- Meal Prep
- Meatless
- Muffin
- Muffins
- One Pan
- Pancakes & Waffles
- Pancit
- Pantry
- Party Food
- Pasta
- Pie
- Pizza
- Pork
- Pork Recipes
- Pressure Cooker Or Instant Pot
- Pulutan
- Quick Breads
- Salad
- Salad Dressing
- Salad Dressings & Toppings
- Salads
- Salsa
- Sandwich
- Sandwiches
- Sauce
- Sauces
- Sauces & Marinades
- Seafood
- Seasoning
- Seasoning Mix
- Seasonings
- Sheet Pan Dinners
- Side
- Side Dish
- Side Dishes
- Sides
- Sides & Vegetables
- Slow Cooker
- Smoothies
- Snack
- Snacks
- Soup
- Soup Recipe
- Soups
- Soups And Stews
- Spice Mix
- Spices
- Spreads
- Starter
- Stew
- Thanksgiving
- Turkey
- Tutorial
- Vegetable